Battling Rope
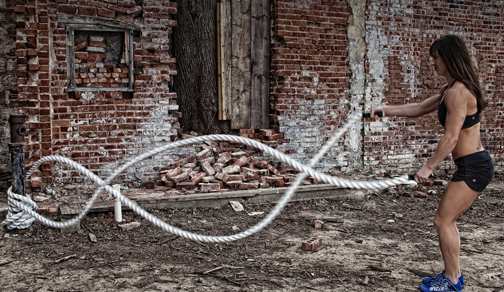 If anybody knows about strength conditioning, it’s John Brookfield. John is a Guinness Record holding strong man, who has done some amazing feats in his life. He’s done such things as pull a 24,000 lb. truck a full mile and use a 50 lb. Sledgehammer for over an hour, hitting a tire about 30 times a minute. Obviously, John also knows about stamina conditioning as well! He’s also an author of four books on strength conditioning and is the inventor of the Battling Rope and it’s associated exercises. So, you can rely on the fact that when you use a Battling Rope to exercise and condition yourself, you’re using a product that will do what it’s intended to do, since it’s inventor knows what he’s doing!
The concept behind the Battling Rope is quite simple, as all great inventions are. It’s simply a long length of rope that’s either attached to a wall or doubled up and slipped over a metal pole. You exercise by using a sort of whipping motion with your arms. The idea of these exercises is to build strength, yes, but it’s a strength that has a lasting power. It’s all about duration. The undulating motions use muscles rarely used in the arms, back, and abdomen, and since you do these motions repeatedly over and over, in time it will build incredible stamina. This is stamina that you can count on in hard situations, be it sports or other physical activities.
The exercises are fairly unique. As you work out, you will find that you both push and pull simultaneously, as well as performing isometric exercises. This builds hard strength and stamina in the most efficient way in the shortest amount of time. Weight lifting builds strength, too, but nothing can give you the sustainable strength that using a Battling Rope can. The system will also build incredible grip strength, as John has one of the strongest grips in the world (he has ripped 100 full decks of playing cards in half in under three minutes, if that’s any indication as to how strong his grip is).
SPORTSMITH carries three lengths of Battling Rope, in 40’, 50’, and 60’ lengths. These ropes are 1 and 1/2" thick and are made of durable polyester, with a rubber boot at the end to prevent unraveling. If the proper usage instructions are followed, they will last you a very long time indeed. For more information on battling rope click here.
Currently, the military has recently taken up using the Battling Rope to condition it’s elite operatives for missions that might involve them using their physical strength and stamina under long term conditions. Law enforcement agencies have also began using the Battling Rope to better condition their officers, and many professional sports teams have been using the Ropes for some time now, as have Mixed Martial Arts fighters. With a pedigree like one of the world’s strongest men as it’s inventor, the Battling Rope is a unique item, and one that’s sure to be around for a long time to come.
LIFEFITNESS 95T TREADMILL BELT AND DECK REPLACEMENT
Tools that you will need:
- Phillips screwdriver
- 4mm Allen wrench
- 8mm Allen wrench
- 9/16 socket or hand wrench
- Long flathead screwdriver
Make sure the unit is unplugged and the power is turned OFF. Remove the upright tube caps. Remove the front shroud. Remove the finger guards from the sides. Loosen the bolts on each side of the rear roller by 10 turns each. Remove the roller. Pry up the tension arm and remove the small belt from the pulley. Remove bolt from front roller mount and remove the front roller. Remove the 4 deck bolts. Carefully remove the deck and belt. Remember to log the maintenance in the treadmill’s console. For more information about this video click here.
Top 10 Benefits of Using Kettlebell Training
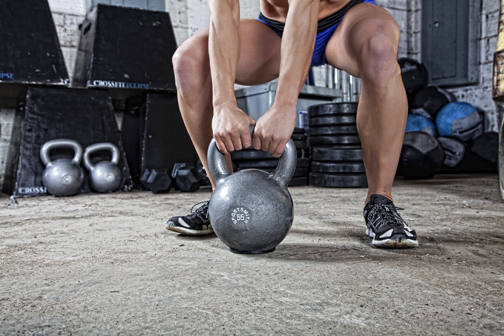 Kettlebells are weights, which resembles a globe with a handle. It has its origins in ancient Greece and it made its way into Russia many centuries ago. However, its popularity as an exercise tool was very recent in the western world.
Top fitness trend for the year 2009:
Kettlebell training was named as one of the top ten fitness trends for the year 2009 by the Council on Exercises (ACE) and still maintains its rising popularity among fitness lovers. For those who are looking for the right fitness tool, Kettlebells could provide the answer. However, making the decision to use Kettlebells should be done with proper understanding and following are the top 10 benefits of using Kettlebell training as a routine workout.
Top ten benefits of using Kettlebell training:
*Total body workout
The design of the Kettlebell with a displaced central gravity would mean that the user has to stabilize the Kettlebell using multitude of muscles and joints. Thus, each swing, press or a lift using a Kettlebell would invariably workout several muscle groups including the stabilizing muscles as well as joints.
*Efficient exercising tool
Its efficiency would be another benefit of Kettlebells and could be attributed to the ‘ballistic nature’ of Kettlebell training exercises. Swings, snatches, clean and jerks would make the body move as a single unit and therefore would be more efficient than traditional weight bearing exercises.
*Building core strength
In order to maintain better fitness and good health, one needs to have a strong and a healthy core. Kettlebells would provide just that and according to the plane of motion, the core strength would develop on the same direction. This would mean that, everyday activities such as bending and lifting could be done without a hitch and one would never have to feel sore after such a lift.
*Improved endurance
Kettlebell training will enable a person to gain strength as well as stamina. Thus, it improves the endurance level of a person far superiorly to other cardio exercises, which may not be able to give both at the same time, or to the same extent.
*Improves mobility
Kettlebell design and its training routines will increase muscle flexibility along with muscle strength and joint stability.
*Builds better posture
Kettlebell training would enable a person to strengthen the back muscles from head to toe which is essential in maintaining a better posture and to avoid those nagging aches and pains. It will not only enable better performance during sports activities but would also help in the day-to-day activities as well.
*Fits in with a busy schedule
Kettlebell training sessions are usually shorter than traditional exercise routines although it can achieve the same result. Thus, it would be ideal for persons with a busy schedule whom would not be having time to visit the gym or else to spend time on several exercising machines to build fitness.
*Compact, portable and safe
Kettlebells can be stored in ones bedroom and would not take much space during its workout. At the same time, as Kettlebells come in different sizes and it includes many different training routines, individuals of any age would be able to make use of it without worrying about adverse outcomes.
*Efficient fat loss
Kettlebell training would provide different methods of burning body fat and this would include, increased metabolism due to ‘explosive movements’, building of muscle mass which enables fat burning throughout the day, and hormonal effects due to total body movements.
*Fun and enjoyable
Many exercise routines and equipment would make the person bored and would be less enjoyable with time. However, with its short exercise routines and variations, Kettlebell training would be fun filled and enjoyable to many.
The benefits of using Kettlebells are endless and its superiority has been proved with time as well as through research. With its rising popularity, one could be assured that it would remain a top most fitness trend for many years to come.
Reference:
ACE Study Reveals Kettlebells Provide Powerful Workout in Short Amount of Time – press release
For more information on kettlebells click here.
Put Safety First In Your Gym
 When exercising, it is important that you make sure you have all of the proper first aid equipment to ensure the safety of your health. When working out, your endorphins are flowing, your heart is going a mile a minute, and you’re feeling the best you ever have. However, things can go wrong no matter where you are working out or what kind of exercises you are doing. It is always more beneficial, however, to work out with other people in case a situation presents itself where you need help from someone else. For gym owners, it is important that they stock up on the necessary safety items for their current and future customers.
Some of the first aid supplies that gym owners will want to make sure they have include ice packs, elastic bandages, antiseptic, pain relievers, surgical tape, and gauze. Alongside all of these items, many gyms make it a point to have a defibrillator in stock as well. A defibrillator is an electronic device that administers an electric shock to the heart through the chest wall, in an attempt to restore the normal rhythm of the heart. Going into cardiac arrest during a workout is, unfortunately, not uncommon. Whether you are doing aquatic fitness exercises or aerobic step workouts, there is always that chance that your heart might not be able to take the amount of activity you are putting it through. Therefore, having an Automated External Defibrillator is a crucial element that every gym facility should make sure they have readily available. It’s always better to be safe than sorry.
Exercising and eating right is vital when trying to take care of your body and your health. However, sometimes the effects that stress and poor habits have on your body, can weaken it, causing unexpected injury as well as cardiac arrest. It is suggested that you consult with your doctor before doing any type of straining physical activity, so keep that in mind as well before you jump on that next treadmill. Having these supplies and more, available in your gym, is a beneficial step to take to ensure everyone’s safety.
Drive Belt Replacement for the 95Xi Crosstrainer
About This Video
Drive Belt Replacement Instructional Video for LifeFitness 95Xi Crosstrainer Elliptical
- This video contains a demonstration of how to replace the Drive Belt on your Life Fitness 95Xi Crosstrainer
- For more information about this video click here.
Strength Products for Trainers: Dumbbells, Kettlebells, & Resistance Bands
As fitness professionals, you know the importance of incorporating strength training into a workout regimen. With that being said, you also know not everyone is willing to hop under a bench press or settle under a squat rack. And while these tried-and-true exercises are often associated with strength training, they’re not the only options.
A number of health professionals are introducing clients to alternative forms of strength training. Instead of bench presses and dead lifts, they’re using free weights—dumbbells and kettlebells. And some are even taking it one step further. They’re forgoing the use of physical weights and opting for resistance bands.
As it turns out, a number of people trying to whip themselves back into shape prefer these methods of strength training. They’re not as daunting, especially for those who are out of shape or elderly. Dumbbells and kettlebells offer more varied usage than, say, a bench press. With dumbbells an individual can perform exercises that hit pectorals, biceps, triceps, forearms, and a number of muscles in your shoulders and back.
When individuals use dumbbells, kettlebells, and resistance bands, they have more control over their workout. They get the strength training they need without enduring some of the hardships, like injuries, associated with the more common methods.
For more information, be sure to view our strength training products page.
How to Replace the Drive Belt for a LifeFitness 95T Treadmill
Tools that you will need:
- Phillips screwdriver
- 8mm Allen wrench
- 9/16 socket or hand wrench
- Long flathead screwdriver
Unplug the treadmill and make sure the power is OFF. Remove the upright tube caps. Remove the front shroud. Remove the finger guards. Loosen the bolts on the rear roller by 10 full turns each. Pry up the tension arm and remove the belt from the pulley. Remove the front roller. Reinstall new belt and reassemble everything according to the steps in the video.
Steps In Finding The Right Gym For You
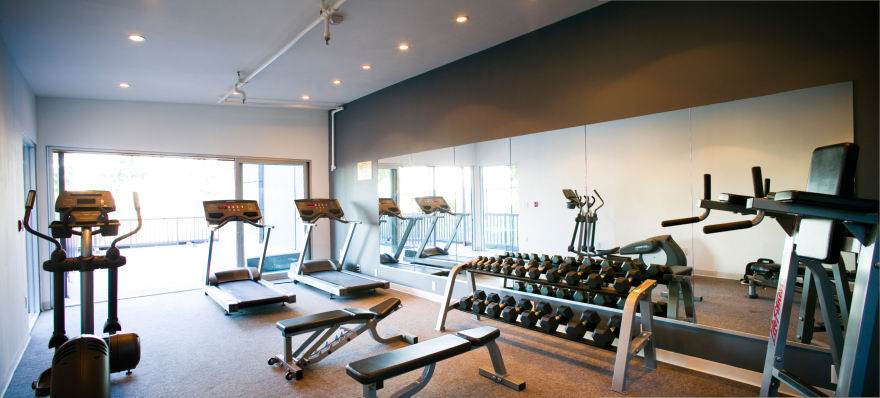 There are many things people should consider when trying to find the perfect gym to sign up for. First, you want to figure out what your goals are in going to the gym – whether you want to lose weight or just tone your muscles. Next, you should choose a gym that you feel comfortable working out at. People tend to slack off if they are in a surrounding that they feel uneasy in. Visiting several gyms, at several different times of the day is the only way to determine what gym you would like to attend, what time you want to go, the friendliness of the staff, the cleanliness, and the stability of the equipment.
Another important element is finding the gym that has the right personal trainer for you and your exercise needs. If you have a certain training routine that you are used to, find someone that has a long history of experience and who will test your current condition before enrolling you in a routine. You want a trainer who is going to motivate you and be interested in your overall outcome. Having conversations with numerous trainers is the only way you will find the perfect one.
Next in line is the fitness accessories and equipment. You want to make sure that whatever gym you decide to go to, that it has the right equipment available for you to reach your ultimate goals. Most exercise machines that are used to target major muscle groups, work all the same, so it can be confusing as well as overwhelming in picking out the right equipment. The key is to look for specific equipment such as treadmills and steppers.
Make sure when searching for a gym to remember that the most expensive gym isn’t always the best gym. Just because it is popularized on TV or is a well-known chain, doesn’t mean that the gym you pick will make you will feel comfortable and at ease when you are working out.
Whether you are looking for aquatic fitness facilities and equipment, or your run of the mill aerobic fitness centers, make sure to look into everything that each place has to offer. Doing a little bit of research never hurt anyone and in this case, it will only benefit your total outcome in the end.
The Best Fitness Centers Have the Best Equipment
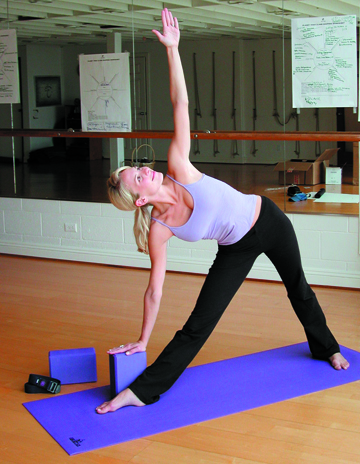 Among, the other high quality gym products we sell, we are proud to provide the best yoga blocks, yoga mats, and yoga straps. Our yoga equipment is used by the best professional trainers and the highest quality health clubs in the industry. Yoga mats and other equipment are in high demand. Some of the most successful group classes in fitness today are yoga classes. Health clubs and personal trainers need to have enough yoga equipment to appease the masses. We provide high quality cost-effective yoga blocks, yoga mats, and yoga straps to maintain the great standards of your business.
In the beginning, of your health clubs yoga training classes, yoga straps are extremely helpful. They assist all different yoga levels in successfully maintaining poses. Your yoga students will gain confidence, which will lead to more visits, with our awesome selection of yoga straps. As your yoga students continue to improve, it is important to present new challenges. This is why we provide a wide selection of yoga blocks. Our yoga blocks can support all different weight levels. If your health club or professional class teaches P90X, we have great yoga blocks to use with this program.
Our selection of yoga mats are light weight and are perfect for all levels of yoga training. From beginners to yoga experts, our yoga mats can be utilized. They provide a smooth non-slip surface, which provides a great location to learn. Treat your customers to high quality yoga mats and keep them coming back for more. Browse our amazing selection of yoga equipment and let us help your business stay up to date.
Star Trac 4000 Treadmill Drive Belt Replacement
About This Video
Star Trac 4000 Treadmill, How to Replace the Drive BeltTools Needed: Phillips Screwdriver, ¼” Allen Wrench, ½” Wrench, Bungee Cord. Tools needed may vary depending on your hardware.
- Switch the Power off on the unit.
- Next, unplug the unit from the wall
- Remove the finger guard retaining screws and carefully remove them from the deck at each end of the rear roller.
- Loosen each rear roller bolt by 10 full turns. Then count the remaining turns necessary to remove the rear roller bolts. Remember to write down the number of turns needed to remove the bolts in each side for future reference.
- Carefully remove the rear roller from the unit. Clean any wax or debris buildup from the roller and place it aside.
- Raise the shroud and secure it with a bungee cord.
- Work the drive belt off the motor pulley by hand turning the flywheel while pushing the belt aside.
- Now remove the front roller retaining bolts.
- Carefully remove the front roller from the unit. Clean any wax or debris buildup and set the roller aside.
- Remember to replace the drive belt before installing the front roller back into the unit. Carefully place front roller on deck under belt and push forward into place, while placing drive belt on inside of the drive pulley.
- Replace the front roller bolts.
- Now spin the roller by hand while pushing the drive belt on to pulley. Be sure to spin the roller several times to insure complete installation of the drive belt on the pulley.
- Install the rear roller into unit. Carefully start each bolt and turn one to two threads to ensure proper mating of threads.
- Tighten each rear roller bolt the number of turns you kept earlier for reference.
- Now, Plug in and power on unit.
- Carefully remove the bungee cord from the shroud and lower it back into place.
- Start the unit at a very slow speed and check for proper belt alignment. Remember to start at the slowest speed possible and be ready to stop the unit quickly if needed.
- If the belt is moving to right side of unit tighten the right roller bolt. If the belt is moving to left side of unit tighten the left roller bolt until belt is tracking properly.
- Caution: make very small adjustments such as ¼ turns and then watch the belt for several moments before making another adjustment.
- Once the belt is tracking properly walk on the unit at a slow speed and check for belt slippage on foot fall. If this is happening tighten each of the rear roller bolts (¼ turns) equal turns until the slippage is no longer occurring.
- Now use the unit at a jogging speed to check for belt travel or slippage.
- If slippage still occurs make small equal adjustments (¼ turns) to both sides of roller and re-test.
- Install the finger guards once you have enough clearance from the rear roller.
- Now plug in and power on the unit.
