Schwinn Triple Link Pedals Everything You Want to Know
These pedals fit all Schwinn Indoor Cycles. Also fits many StarTrac and Keiser Indoor Cycles. They will fit any bike that will accept a 9/16" threaded pedal. This pedal is two-sided with 3 different options of use. One side works with Look Delta style cleat or with the included toe clip. To engage the cage or cleat place it over the pedal and push down.
To adjust the release tension turn the tension screw clockwise to tighten and counterclockwise to loosen. The toe cage has a locking feature to prevent accidental release during use.
You must push down on the lock to remove the toe cage. To remove the toe cage grab it with both hands and turn the front of the cage away from the bike. The opposite side works with most SPD style cleats.
To install the cleats place them over the pedal and push down. To remove turn heel inward or outward to release cleat. To adjust release tension turn the screw. Clockwise will increase and counter-clockwise will lower the tension.
Shop Schwinn Triple Link Pedals
Warning: This pedal is for Indoor Cycles only. Do not use on outdoor bicycles. There are no reflectors for safety, and the pedal can rotate dangerously close to the ground in some instances.
Although it looks the same as the delta style cleat, the Keo cleat is smaller and does not work with this pedal. It is also not compatible with any indoor cycle that accepts tapered
How to Re-calibrate Keiser M3 Indoor Cycle Display With No Tool
This video demonstrates how to re-calibrate the Keiser M3 indoor cycle display without a calibration tool.
To begin move the handle to the straight up position
- Unplug the battery connector from the display
- Wait several seconds before reconnecting
- Wait for the computer screen to go blank
- This will take one to two minutes
- Turn the pedals forward one revolution
- At this point, you should see some numbers flashing
- Move the handle all the way to the down position
- Turn the pedals forward one revolution
- Now the display should show a "1"
- Twist and release the magnet housing five times to save the calibration and exit calibration mode
- "CAL'b" indicates a successful calibration, you can resume normal use of your indoor cycle after the computer goes blank
- "Err2" indicates the handle was too far forward
- Try again with the handle straight up as shown in the video
- "Err1" indicates the handle was too far down
- Try again with the handle straight up as shown in the video
For additional information please visit: Keiser parts
How to Replace The Concept 2 Indoor Rower Chain on Models C/D/E
This video will demonstrate how to replace the chain on a Concept2 indoor rower models C, D and E.
- To begin split the monorail from the frame by lifting the mouse and raising the monorail
- Flip the frame over
- Slide the return mechanism cover out of the frame
- Remove the two SCAM pieces after taking note of the way the SCAMS connect for assembly
- Hold the shock cord with one hand
- Disconnect it from the pulley axle with your other hand
- Slowly release the tension of the shock cord
- Remove the nut and bolt holding the chain to the traveling pulley
- Our machine used an 11mm wrench and a Phillips screwdriver
- Remove the two connectors from the end of the chain taking note of how they attach to the chain
- Remove the chain from the traveling pulley
- Feed the end of the chain into the frame, while pulling the handle end of the chain to remove the chain from the rower
- Remove the U-bolt from the handle
- For plastic handles push the U-bolt forward and remove the nuts from the U-bolt
- Our machine used an 11mm wrench
- For wooden handles use a screwdriver handle to tap the U-bolt down to remove the nuts
- For plastic handles push the U-bolt forward and remove the nuts from the U-bolt
- Install the U-bolt onto the new chain swivel
- Install the new chain and U-bolt to the handle
- Upright the frame and secure the handle into the foot straps
- Place the frame in the storage position as shown in the video
- Feed the end of the chain through the chain guide and into the hole in the top of the frame
- Feed the chain around the sprocket
- You will need to spin the sprocket from the bottom to get the chain around the sprocket
- Flip the frame upside down
- Verify the chain only goes around the sprocket while feeding it toward the rear of the frame
- Feed the chain through the traveling pulley from the bottom and around the pulley as shown
- Make sure the chain is not twisted around itself or the shock cord
- Feed the chain toward the front of the machine and install it around the pulley bottom side first
- Make sure it is not twisted around itself or the shock cord
- Feed the chain back toward the rear of the machine
- Install the connector pieces as shown to the chain
- They install in opposite directions
- Install the chain to the traveling pulley with the nut and bolt removed earlier
- Connect the two SCAM pieces to the axle as noted earlier
- Again, Verify that the chain and shock cord routing is correct and not twisted or overlapping
- Install the return mechanism cover
- Upright the frame
- Connect the frame to the monorail
- Test the rower
- If the shock cord does not return verify the shock cord path and the chain routing is correct. You should also confirm that both are on all the pulleys.
Shop All Concept2 Rower Chains.
Which Bottom Bracket Tool Do I Need?
This video highlights two different bottom bracket styles and the required service tools. There are two different styles of tools used to remove the bottom brackets on most indoor cycles. The ISIS (International Splined Interface System) version has 8 notches.
The square tapered shaft version has 20 notches To determine which tool you need, look at the bottom bracket and count the notches in the cup. The video shows an example of both styles, side by side for comparison.
Shop all bottom bracket tools for you indoor cycles.
How to Properly Align a Schwinn AD6 Airdyne Fan Cage
This video will show how to align the fan cage on a Schwinn Airdyne AD6 to fix a rubbing fan.
There are two things that can cause the cage to rub the fan on this bike:
- The fan cage is bent or the mounting is off due to loose hardware or damage to the cage. If you have recently relocated your bike this is the most likely fix for your bike.
- Bad axle alignment in the frame causing the fan to be crooked inside the frame and fan cage.
This video will address fan cage issues. For more about axle alignment issues see our video about how to align the Airdyne 6 fan axle.
- If the rubbing is minor or the fan cage has visible damage you may be able to bend the cage out of the way as shown in the video.
- Make small adjustments to the ribs until you have clearance for the fan.
- In some cases, you may need to loosen the cage hardware and align it around the frame.
- You will need to remove the shrouds from both sides. There are six Phillips head screws in each shroud. Remove the upper center screw last to easer removal of the shrouds.
- Loosen the cage hardware.
- Make small adjustments to the fan cage and test until the problem is fixed.
- Re-attach the cage to the frame.
- Replace the shrouds.
- To ease shroud installation put the pedal in the position seen in the video on each side.
- Put the shroud in place and install the top center screw first to make installation easiest.
Additional Resources:
View all Airdyne 6 Parts
How To Restore or Maintain Leather Indoor Cycle Brake Pads
This video will show how to restore or maintain your leather indoor cycle brake pad.
( Note ): If your pad looks glazed over and will not accept lube try roughing them up with a wire brush. If the pad is too worn down they will need replaced.
These are the most effective ways to prolong the life of your indoor cycle brake pad.
We begin with the pad removed to show the most effective procedure.
Method 1:
- Soak the leather pad in a vessel with Three in one oil for one hour.
- Wipe the pad before placing them back on the bike.
- With the pad back on the cycle, spin the flywheel and engage the brake several times.
- Wipe off the excess oil from the flywheel before returning the cycle to service.
- This will prevent excessive lube running off the pad.
Note: The following two methods will need to be done regularly to prevent squeaking.
Method 2:
- With the leather pad on the indoor cycle. Apply lubricant directly to the flywheel.
- Spin the flywheel while pressing and releasing the brake. This will load the pad with the lubricant.
Method 3:
- With the pad on the cycle load a rag with lubricant and hold it on the flywheel by the brake pad.
- Rotate the flywheel while pressing and releasing the brake to lubricate the leather pad.
Additional Resources:
What is the cause for static on my treadmill?
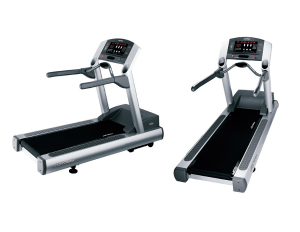
If you are a frequent user of the treadmill, it is most likely that you have received a shock from it once or repeatedly. Treadmills are powerful machines capable of generating static electricity. This static electricity is responsible for the shocks and, even though they won’t hurt you, they may damage the treadmill’s electric components.
Most cases we receive regarding static electricity on treadmills are in the winter season. But the good news is, you can easily overcome static build-up on the treadmill to reduce the risk of being shocked and have a comfortable workout session. Here are some of the sources responsible for static problems and their suggested solutions.
- Problems that the gyms have control over;
- Worn out motor brushes, belt and deck. If any of these parts on the treadmill are worn out, replace them. A motor brush should be replaced if it has cracks, nicks, signs of wire wearing through, or if it’s less than a ½ inch length. Determining whether your treadmill’s walking/running belt is worn out can be difficult if you don’t know what to look for. Common signs that the belt requires maintenance or replacement include discoloration, fraying edges, sluggish belt movement, and loosening. Check your treadmill deck for signs of wear or cracks and have it replaced. If the problem seems complex or severe, always consult a professional to have the machine professionally serviced. Replace belt and deck together.
- Lubrication maintenance. Lack of, or poor, lubrication maintenance of the treadmill can result in excessive friction created by the repetitive motion. This friction creates static electricity leading to shocks. However, with proper lubrication on the belt, deck, as well as all the moving parts of the treadmill, this static electricity can be controlled. Loosen the belt. Then lift it up to apply the lubricant on the deck as per the instructions on the bottle. Always refer to the owner’s manual for the type of lubricant recommended by a manufacturer. Place the belt back to its position and re-tighten the screws. Turn the treadmill on and allow it to run for 5 minutes at a low speed. This allows the lubricant to evenly penetrate into the moving belt.
- Lack of Humidity in the air. Dry air in the workout area leads to a bigger risk of static shock. And that is why you are most likely to feel the slight sting of static when working out indoors or in areas with dry climates. This is because indoors, air conditioners and heaters suck out all the moisture in the air leaving it dry. Therefore, the only way to banish static shock is by placing a humidifier in the room to bump up humidity levels. A humidity level of 40 to 60 is recommended.
- Dusty Climate. Dry and dusty environments amplify the presence and intensity of static electricity on treadmills. Treadmills that are not cleaned regularly experience dirt buildup and increase your chances of being shocked. To prevent this, add a weekly cleaning routine to your workout and this will not only prevent static buildup but also increase the lifetime of your machine. The clean-up is simple. Just remove any accumulated dust from the belt using an anti-static duster. Dust around and beneath the treadmill to avoid any buildup. Then wipe down the belt with a slightly dampened cloth and dry with a paper towel. Ensure that you rotate the belt to reach the entire tread surface effectively.
- Bad Ground. Failing to plug your treadmill into a grounded, dedicated outlet can also increase the risk of static shocks. Check the ground where the machine is placed to see that the power cord, power outlet and drive motor are fine. However, the metal and electrical systems of the machine may be well grounded, but the rubber tread is a good insulator and therefore the static charge may build up because the tread itself is not grounded. Another common grounding problem would be in relation to motors. If you experience static shocks, consider adding an additional ground wire to the motor of your treadmill.
- Treadmill placed on carpet. A treadmill placed directly on carpet is more vulnerable to static electricity. Static electricity could build up as you get on and off the treadmill. A great solution to this problem would be to install a rubber treadmill mat under the machine. This mat will not only protect your treadmill, but also the carpet under the unit from scratches and dents by the unit’s feet.
- Items that the gyms have no control over;
- Dehydration of the user. If a user works out a lot and gets dehydrated, their skin dries and this poses a chance for static energy to build up. Dry skin increases the friction generated between the user and the machine when running or holding onto the treadmill rails. Encourage users to take in more water to avoid dehydration.
- Dry skin of the user. Encourage the users to use an adequate amount of lotion when coming for a treadmill workout. Lotion softens the skin and acts a lubricant when they are holding on to the treadmill surfaces. It reduces friction and thus lowers the risk of static electricity buildup. Ask the users to combine this strategy with higher water intake so as to keep their skin hydrated.
- Use of wool or synthetic materials when working out. Materials such as nylon, polyester and spandex are more susceptible to static build up. Synthetic fabrics build up more static charge than clothing made from natural fibers. So, if a user complaining of shocks has been working out with such gear, ask them to change. Recommend to them clothing made of cotton or any other natural fibers.
- Run pattern of the user. The running pattern of a treadmill user can contribute to static buildup. If a user is shuffling their feet instead of having a smooth stride, they are likely to generate excessive friction which results in the creation of static electricity. They are most likely to get shocked. If you notice such, advice the user to change their running pattern to smooth strides.
- Shoes. Advise the user to always check their shoes before hopping onto the treadmill for a run. Tell them to clean the bottom of their shoes to remove any dirt, dust and other items they may have collected on their way to the gym. Such materials create more surface area for friction to buildup and give you some static shocks. Also encourage the users to wear good fitting shoes. Old shoes may be too worn out and hence cause friction buildup. Users should also avoid shoes without nylon mesh.
If all else fails, consider using an anti-static spray that you can apply to your clothes and the treadmill’s running belt. The spray moistens the area and hence helps to diffuse static shock. It also makes the surface area less conducive for electrical charge build-up.
Why Your Treadmill Belt Maybe Slipping

With a treadmill, one of the most common issues people experience is a belt that's slipping. There are a few reasons this might happen. Luckily, there are also a number of fairly simple ways to fix this issue that you can do on your own, without calling anyone to service the machine.
Why Your Belt Might Be Slipping
There are actually two belts on a treadmill - there's the belt most commonly talked about which is the walking / running surface of your treadmill. And then there's the drive belt which connects from the motor to the front rollers. In this case, we're discussing the walking surface of your treadmill.
There may be a few reasons why your belt is slipping. Before trying to figure it out on your own, or even with general instructions like these, you want to check the manual produced by the manufacturer of your machine.
This is especially important if your machine is newer or still under warranty because the warranty may limit what repairs you can do yourself. Many warranties specify that only a repair service authorized by the manufacturer can perform certain repairs, so that's something to keep in mind before moving forward.
- Too Much Friction. In some cases, the belt may need to be lubricated because the friction may be causing the belt to slip. Be sure to check your owner’s manual for the compatible lubrication.
- Tension. Most often this is just a case of needing to adjust the tension of the belt. With use and age, the belt can naturally stretch, losing some of the tension and causing the belt to slip. There are a number of methods to correct this which we'll discuss in detail below.
- Drive Belt. In some cases, the running belt may be stopping because the drive belt needs to be tightened on some models. This can be performed at home, though you'll want to check your manual. This type of repair will usually void the warranty if there is one.
Adjusting the Tension in Your Running Belt
If your belt is slipping, it's usually a matter of adjusting the tension. There are three different methods to repair this issue, which work on new belt installations as well as repairing existing running belts.
Stomp Test on Front Roller
The stomp test is a great way to test the retention on your running belt and repair an existing belt that's slipping.
- Check the rollers and underneath the belt to make sure there is no debris or wax buildup.
- Verify that belt centering is correct or true.
- Stand on machine and set to 3 mph.
- Attempt to stop the running belt from moving by bracing your feet on the running belt and your hands on the bar.
- If the belt slows or slips and the rollers are still moving, your tension needs to be adjusted. To do this, turn the adjustment tools on both sides of the rear roller to tighten, about a quarter of a turn to start.
- Repeat test and adjust until the rollers stop moving when you stop the belt.
Using Belt Gauges
For most belt replacements, using calipers would be a preferred method. It can be done without gauges, though this does make the process slightly simpler. Gauges can also be used to adjust machines with existing belts.
- Using belt gauges or calipers, you're going to stretch the belt according to the manufacturer's specifications.
- This method is usually used on a new belt but can be performed on a machine where the tension just needs to be adjusted. In the case of an existing belt, you need to release the current tension before applying the gauges.
Without Using Calipers
- In the case of an existing belt, release the current tension before proceeding.
- Using a tape measure, put two marks on each side of the belt, 36 inches apart in the length.
- Then adjust the side bolts on both sides to 36 and 3/16 inches.
- Test the machine and adjust if needed.
There are a few reasons that your treadmill belt might start slipping. It could be a simple matter of age and use. A lot of activity on the machine or heavy running can also cause the belt to stretch faster than moderate use might. Armed with this information, you should be able to diagnose the issue. Some repairs may be more advanced than what we've detailed here and it's always advisable to check the manufacturer's manual before attempting any repairs.
Additional Resources:
How to Use a Multimeter for Electronic Testing
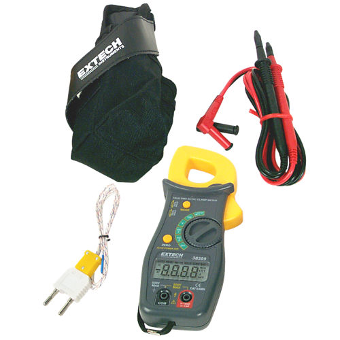
A leading cause of failure in fitness equipment is insufficient power to the internal components of a machine or no power at all. Knowing the basics of using a multimeter will be a great help in your troubleshooting efforts.
~
How to Use a Multimeter for Electronic Testing
Digital multimeters come in a variety of forms for use in electronic testing. For most situations be sure your multimeter can handle:
- DC and AC volts
- Ohms
- Continuity
- AC and DC current
Manual range meters are the most common, but auto range meters are easier to use. You need to set your meter to the correct setting, on manual range meters. The scale will adjust automatically to the necessary range for the values you wish to measure, on auto range meters.
~
Precautions
If your multimeter has settings or symbols different to the ones we discuss, consult your owner's manual to verify its ability to test the circuit you want to test.
You need to know what circuit you are testing and the value you want to verify. Otherwise, you may damage the circuit or your meter. Never touch the exposed metal part of the probes or any metal surface that may be carrying a charge.
~
Continuity Testing
Continuity is a good way to test for any shorts in a circuit. Continuity testing shows whether there is or is not a complete connection. To indicate a connection, the meter will indicate:
- “beep” and/or any value other than 1 on left of display.
- no beep and/or 1 on left of display
This test should be done while the circuit is disconnected from any source of power. Be sure the red lead is plugged into the continuity socket. If your meter doesn't have a continuity socket, use the Ohms socket. The black lead should go into the Com socket. Some meters only have two sockets. Connect Black to the Com socket, and connect Red to the other socket.
If you cross the leads, the meter will show a low value or beep. This means there is continuity. It does not rule out the possibility of shorts.
EXAMPLE: If you have a piece of wire that you want to test for breaks, this can be done easily using the continuity meter, you can test for breaks by touching each end of the wire with a probe.
Suppose that same piece of wire is a wire loom, meaning several pieces of wire are inside the same insulator. You can use your continuity meter to check that the wires are continuous. You can also check for any shorts by touching both ends of any conductor. Touch both ends of each wire with your probes. You should hear a single beep or see a value displayed.
- No beep & no value = circuit is not continuous
- Beep & value = a short
~
Resistance Testing
To test for resistance; be sure the Red lead is in the Ohms socket, the black lead is in the Com socket, and the meter is set to Ohms.
IMPORTANT: test the resistor with one end disconnected from any circuits.
~
Testing for DC Volts
- Connect the black lead to the Com socket
- Connect the red lead to the Voltage socket
- Set the dial to DC voltage (one range above value you are checking for)
- Do not to cross the leads - it will short the circuit
If you get a zero reading, check the setting on your meter, as it may be set to AC.
You can check voltage without disconnecting it from the machine if you have a battery installed. To do this, probe the positive and negative ends on the battery.
~
Testing AC Volts
Set your meter to the AC Volt setting and range (one range above the reading you’re looking for). Insert the red lead in the “V” socket, and the black probe in the “Com” socket.
Do not short the leads during testing. It will short the circuit and may damage your meter.